|
Extraction and Conversion of Protein Translation
This is the fifth and last tutorial in the Arabidopsis example file. We will be extracting the protein translation sequence for data conversion. As with the past tutorials, make sure you have Vect open and are in the 'Input Data' panel with the AC006439.txt file opened. The protein translation is the most complicated step in this example because it includes all of the following rules; 1) New Block Open & Close Conditions, 2) Position Independent, 3) Concatenation and 4) Quoted Data.
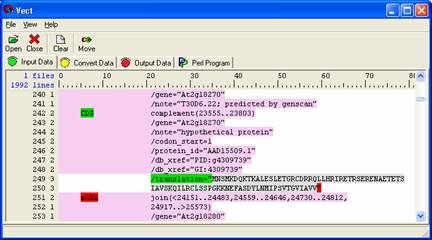
Right click on the 'CDS' letters and choose New Block Open Condition from the pull down menu. A green box will appear. Right click on the 'mRNA' letters and choose New Block Close Condition from the pull down menu . A red box will appear.
Right click and drag over '/translation=”' and select New Block Open Condition. Right click and drag over the ending quotation (") mark and select New Block Close Condition. Right click again on both '/translation=”' and the closing quotation (") mark and choose Position Independent from the pull down menu. This allows the closing condition to be independently located, yet not located where the other quotation (") mark appears. If you play around with these selections, you will get a better feel for their capabilities.
Select the data by left-clicking anywhere on the translation sequence. This will highlight the whole translation grey. Scroll down to ensure other parts of the translation are properly selected. Your selection should be similar to the selection shown below.
Select ' Move ' from the Icon panel. Your data now appears in the 'Convert Data' panel where two more rules will be applied. First, concatenate the data by selecting 'Insert' from the icon panel and selecting the Concatenate Rule. Specify a descriptive name and select the protein data as the data to be used.
Concatenate to a level 3 by left-clicking on the level 6 words that are highlighted in grey. The concatenation rule makes each line into a string based on the set in which the data appeared.
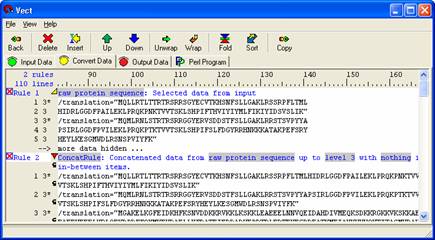
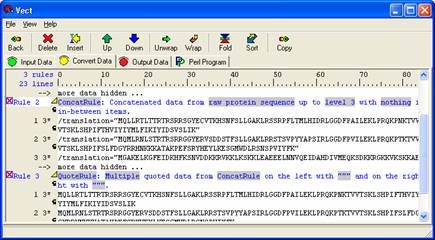
Apply the 'Quoted Data' rule by selecting 'Insert' from the icon panel. Give the rule a descriptive name and specify the rule from which you have already concatenated. Replace both grey boxes labeled 'nothing' with quotes (") instead. Your data panel should look like the one shown below. If you have trouble, review your steps.
Select Rule 2 , the concatenated sequence. Click the ' Copy ' button from the icon panel to move your data to the 'Output Data' panel by In the 'Output Panel' users can add any text format to the data set and view the changes by selecting the 'Output' icon in the icon panel.
The tag should not be modified but can be moved around. If users wish to limit the output to a set line width, the tag may be edited by including a ':width' before the closing bracket (>). This restricts the body from flowing past the specified width. Example:<gene sequence:60>
To show the Perl code, move to the 'Perl Program' panel and select 'Compile.' Your Perl program appears as shown below. To run the program generated, select the 'Run' icon. A new window will appear with the results of your Perl program.
You have now completed the Vect Version 1.0 Extended Tutorial. Please stay updated for further version of Vect at http://www.complexcomputation.org.
Complex Computation Laboratory
Iowa State University
Denise Mooney
Revised by Choongseo Chung
Nov 2005

|